
video tutorials for social media
How To Add Live Caption To Audio And Video on Almost Any Device
Videography is at its peak, and excelling in video content creation would be a survival move for businesses in the coming years. Video content is also known as the most accessible form of content for everyone, including people with several disabilities. Adding live captions enhances the accessibility and quality of videos. Live captioning allows people with hearing impairments to follow along with the audio track of a video or audio recording. It’s also great for those trying to understand a language they don’t know or for those who prefer to read along as they watch or listen.
The read of this blog post will help you add live captioning to almost any device. Whether you’re using a laptop, tablet, smartphone, or streaming service like Netflix or YouTube, I’ll show you how to get started with live captioning. There are different types of captioning available.
There are two main types of captioning: open captions and closed captions. Open captions are permanently burned into the video and cannot be turned off or changed. On the other hand, closed captions can be turned on and off by the viewer and can also be changed in terms of font size, color, and style. Let’s move on to how to add them to your device.
- On most devices, you can add live captioning through the accessibility settings. For example, if you have an iPhone or iPad, you can go into Settings > General > Accessibility > Subtitles & Captioning and then turn on the “Live Captions” option.
- If you’re using a laptop or desktop computer, you may need to download additional software in order to enable live captioning. For example, if you’re using Windows 10, you can download the Windows Speech Recognition app, which will allow you to add live captions to your videos and audio recordings.
- If you’re using a streaming service such as Netflix or YouTube, many of them have built-in captioning options. On Netflix, for example, you can go into your account settings and turn on the “Closed Captioning” option, enabling live captions for all of your shows and movies. On YouTube, an “Auto-Generate Captions” feature will generate closed captions for any video uploaded with audio.
- The live captioning feature has been available on Pixel phones since the beginning of 2020, and it’s also available on other Android devices.
Finally, suppose you want to add caption to videos or audio recordings that aren’t available on streaming services such as Netflix or YouTube. In that case, several third-party apps and services can help. One such service is Rev Voice Recorder, which allows users to record their own audio files and then generates closed captions using their speech recognition technology.
Add Live Caption in Chrome
Live captions are becoming increasingly popular, especially with the rise of video conferencing platforms like Zoom and Google Meet. They allow users to have conversations in real time without needing to type out every word they say. Live captions are also helpful for those who are hard of hearing or deaf, as they can follow along with the conversation more easily.
Fortunately, it’s easy to add live captioning to your Chrome browser. This guide will walk you through setting up live captioning in Chrome.
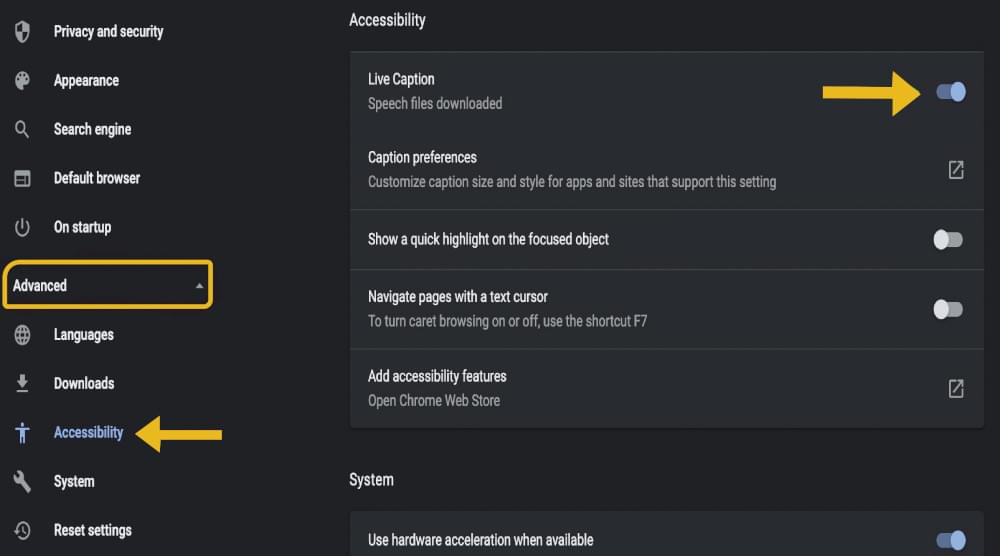
Step 1: Install the Live Caption Extension
The first step is to install the Live Caption extension from the Chrome Web Store. This extension will allow you to enable live captioning in your browser. Click the “Add to Chrome” button and follow the prompts to install the extension. Once it’s installed, you’ll see a small “Live Caption” icon in the top right corner of your Chrome window.
Step 2: Enable Live Captioning
Once you have the Live Caption extension installed, you’ll need to enable it before using it. To do this, click on the “Live Caption” icon in the top right corner of your Chrome window and then select “Enable Live Caption.” You’ll see a pop-up window asking if you want to allow this extension to access your microphone — click “Allow” and then click “Done.”
Step 3: Start Capturing Audio
Now that you have enabled live captioning in Chrome, you can start capturing audio from your microphone. To do this, click on the “Live Caption” icon again and then select “Start Capturing Audio.” You’ll see a pop-up window asking if you want to allow this extension to access your microphone — click “Allow” and then click “Done.”
Step 4: Customize Your Settings
Once you have enabled live captioning in Chrome and started capturing audio, you can customize your settings by clicking on the “Live Caption” icon again and then selecting “Settings.” Here, you can adjust font size, language, and more. You can also turn off live captioning anytime by clicking on the “Live Caption” icon and selecting “Disable Live Caption.”
Step 5: Enjoy Your Live Captioning
Once you have enabled live captioning in Chrome and adjusted your settings, you should be able to enjoy real-time captions as you talk or listen! Live captioning is a great way to stay connected with friends or colleagues during video calls or meetings or for those who are hard of hearing or deaf.
Adding live captions in Chrome is straightforward! With just a few clicks of your mouse, you can enable live captioning in Chrome so that everyone can stay connected during video calls or meetings — no matter their hearing abilities.
Turn Off Live Caption in Chrome
Are you looking for a way to stop live captioning in Chrome? Live caption is a feature in Chrome that automatically provides captions for any audio or video content you watch. While this can be a valuable tool for those with hearing impairments, it can also be annoying and intrusive for some users. Fortunately, you can take a few simple steps to turn off live captions in Chrome.
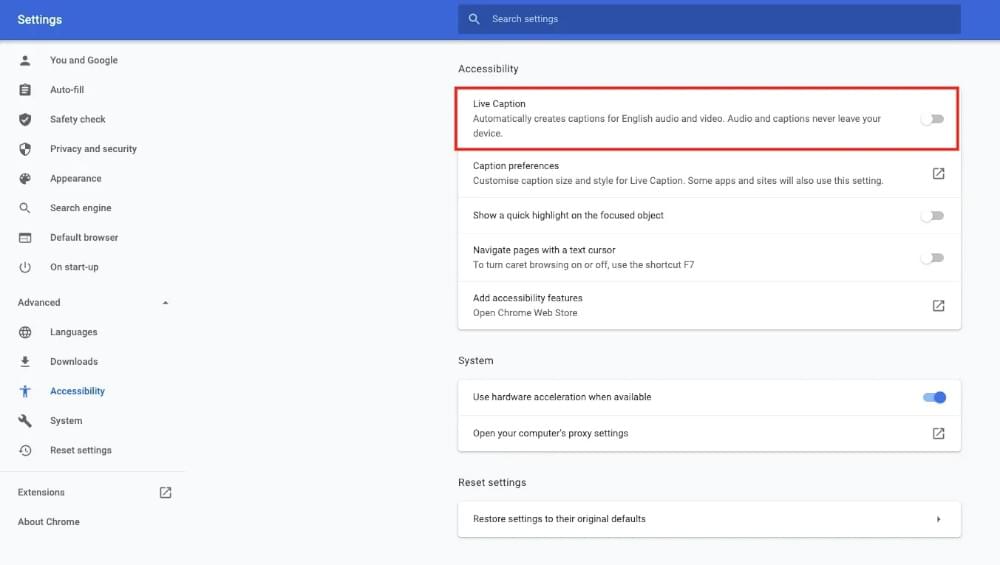
First, open the Chrome browser and click on the three dots in the upper right-hand corner. From there, select “Settings” from the drop-down menu. On the left-hand side of the page, click on “Advanced” and then scroll down to “Accessibility”. Here you will see the option to turn off “Live Caption”. Toggle this setting off, and you should no longer see captions appear when viewing audio or video content.
If you want to take your control of live caption a step further, you can also customize how it works by clicking on the “Manage Live captions Settings” link at the bottom of the page. This will bring up a new window where you can adjust the language, font size, and other settings related to live captions. You can also choose whether or not to have captions appear automatically when viewing an audio or video content or only when prompted by clicking on the “Caption” button in Chrome.
Finally, if you find that live caption still appears on certain websites even after turning it off in your settings, there is another way to stop it from appearing. To do this, right-click anywhere on the page and select “Inspect” from the drop-down menu. This will create a new window with various HTML elements and code related to that page. From here, look for any line of code that includes “live caption” and delete it. This should stop live captions from appearing on that particular website.
Add Live Caption on Android Phone
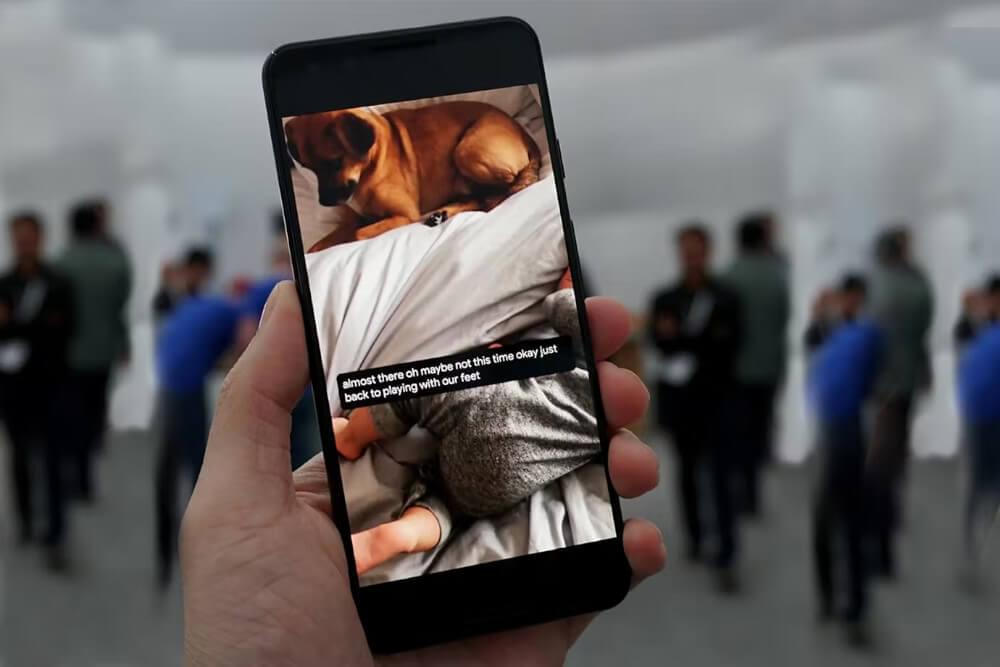
Android’s “Live Caption on” feature is a handy tool for people who are hard of hearing or need extra help understanding what’s being said in a video but works on Pixel phones only.
To turn Live caption on, open the Accessibility menu in your Pixel phone’s Settings. Then tap “Live Caption” and toggle it on. Once enabled, you can start watching videos with captions right away. You can customize the caption settings by tapping the “Settings” button next to the toggle switch. Here you can choose which language you want the captions to be in and adjust the font size and color of the captions.
Add Live Caption on iOS Phone
The world is becoming increasingly digital, and the need for accessibility is rising. The Live Captions feature uses artificial intelligence (AI) technology to detect and transcribe speech in real time. The captions are generated in near real-time, so you don’t have to wait for them to appear. You can also customize the appearance of the captions by changing their font size, color, and background color.
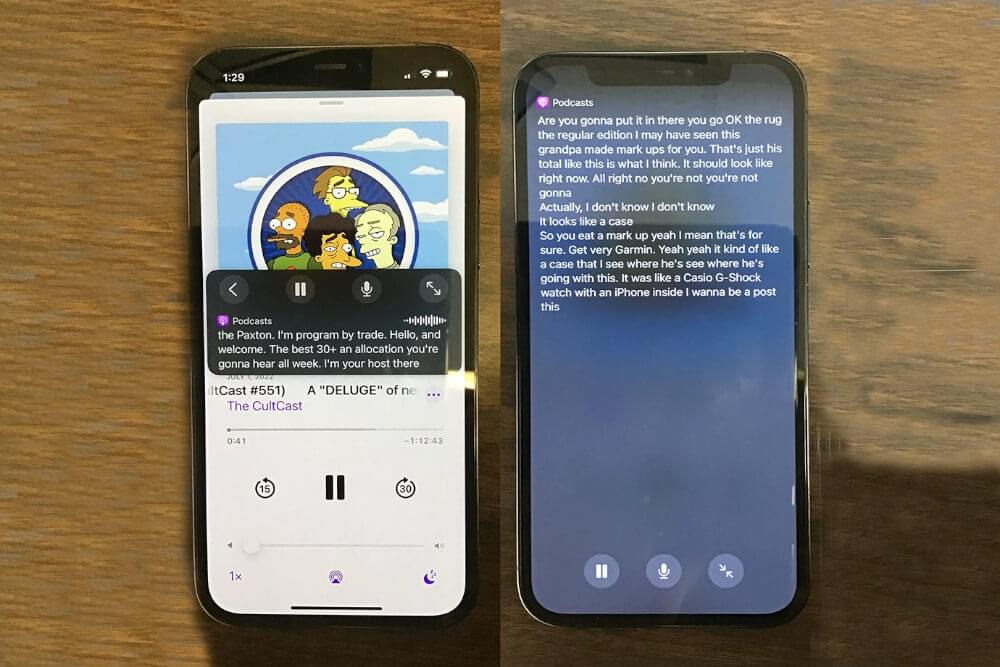
The iOS “Live Captions” feature is an excellent example of how Apple makes it easier for everyone to access the content. The Live Captions feature works on iPhone 11 or later, and it’s designed to provide captions for videos and audio in real time.
To use Live caption on your iPhone 11 or later, you need to go into Settings > Accessibility > Live Caption. Once enabled, the Live Caption feature will automatically caption any video or audio content you watch or listen to. This includes videos on YouTube, movies on Netflix, music on Spotify, and podcasts.
Add Live Caption on Windows
Microsoft’s latest innovation, “Live Caption”, is a feature that allows users to access real-time captions on their Windows 11 device instantly. This new feature is designed to make it easier for people with hearing impairments to access audio and video content without needing external hardware or software.
Live captions are an exciting new development in accessibility technology. It uses artificial intelligence (AI) and machine learning (ML) to provide real-time audio and video content captions on Windows 10 devices. The feature works by using speech recognition technology to detect words in the audio and display them as captions on the screen. Live captioning is available in English, Spanish, German, French, Italian, Portuguese, and Chinese.
The live captions are easy to use and can be enabled with just a few clicks. Once enabled, it will automatically detect when audio or video is playing and display captions on the screen. The captions are displayed in a box at the bottom of the screen so they don’t obstruct other content. The box size can be adjusted so that it doesn’t take up too much space on the screen.
Steps To Turn on live captioning:
Follow the following steps to turn on live captions:
- Click on the Live captions toggle in the quick settings Accessibility flyout. (Go to the battery, network, or volume icon on the taskbar to open quick settings.)
- Push the Windows logo key + Ctrl + L.
- Choose Start > All apps > Accessibility > Live captions.
- Move to Settings > Accessibility > Captions, and press the Live captions toggle.
When the live captions are activated for the first time, this feature will provoke you to download live captions language files to be operated by speech recognition facility.
Customize how captions are on the show
You can choose to customize live captions from your desktop:
- Go the Settings option in the live captions window bar.
- Press Position.
- Click any of Top, Bottom, or choose Floating on screen.
- Choosing Top or Bottom button means that the live captions window will show up on the top or bottom screen edges as a reserved area on your desktop. By this other activities on desktop will not be effected. When adjusted on the top, you will notice that live captions works effectively during virtual meetings, or while sharing screen. Adjusting to the bottom is useful for video viewing activities.
- Choosing Floating on screen means that the live captions will be seen in an overlay window, you can use it as needed while not disturbing the activities of other windows in use.
To enhance the text readibility, increase the size of window.
Adjust captions easier to read
- Go to the the Settings in the live captions window bar.
- Click Caption style. Choose the Accessibility option.
- Under Caption style, follow the following pattern:
- Choose Default from the dropdown menu. You can choose appropriate colors according to your desktop colors.
- To choose light or dark mode move to Settings > Personalization > Colors > Choose your mode.
- Choose the Edit option to custom the as per your need.
Use your microphone
You can caption your own speech with windows live caption mode:
- Choose the Settings option in the live captions window bar.
- Choose Caption options, and press Include microphone audio button.
Live captions are also offers customization options so users can tailor the experience to their needs. For example, users can choose from different caption formats such as full-screen or split-screen, as well as different font sizes and colors. They can also choose whether they want to see speaker labels or not.
One of the most impressive aspects of Live captioning is its accuracy. Microsoft claims its AI-powered speech recognition technology can recognize words with up to 95% accuracy in real time. This means that users will get accurate captions even when listening to fast-talking speakers or watching videos with background noise.
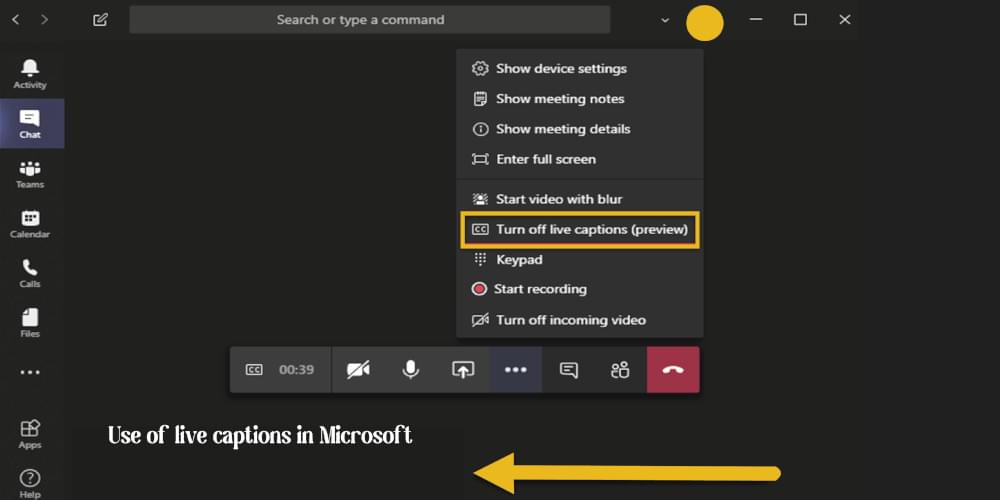
Live captions is an exciting development for it’s easy to use and offers a range of customization options so that users can tailor the experience to their needs. With its high accuracy rate, Live captions is sure to be a welcome addition for anyone looking for an accessible way to enjoy audio and video content on their Windows 10 device.
Add Live Caption on MacOS
Live captions are real-time captioning of any audio or video app such as facetime or Podcast or even live conversation in virtual meetings. They are available only in Apple Silicon and in some languages, countries, or regions. Live captions are available in the Beta version.
The accuracy of life captions is also not guaranteed; you can use them when needed in emergencies.
Steps To Turn Live Captions on or off
- On your Mac, select Apple menu > System Settings, choose Accessibility at the sidebar, then press Live Captions (Beta) on the right. (You may have to scroll down a bit.)
- Select Turn Live Captions on or off as per choice.
- The Live Captions window will appear on the screen. You can hide the window when no audio is caught, press the Live Captions button in the menu bar, you can ensure that Onscreen isn’t selected.
How SubtitleBee Can Help?
With this revolutionary tool, you can easily caption videos, translate subtitles, and transcribe audio to text - no matter your device or platform. SubtitleBee is designed to help you create captions and subtitles with ease. It’s fast, easy, and incredibly versatile - making it the perfect tool for any video project. Plus, since it’s cloud-based, your subtitle files are always accessible from anywhere in the world. So whether you’re a professional filmmaker or just getting started in the world of video, SubtitleBee can help you add captions and subtitles quickly and easily. So what are you waiting for? Get started today with SubtitleBee! With this revolutionary tool, you can easily caption videos, translate subtitles, and transcribe audio to text - no matter your device or platform. SubtitleBee is designed to help you create captions and subtitles with ease. It’s fast, easy, and incredibly versatile - making it the perfect tool for any video project. Plus, since it’s cloud-based, your subtitle files are always accessible from anywhere in the world. So whether you’re a professional filmmaker or just getting started in the world of video, SubtitleBee can help you add captions and subtitles quickly and easily. So what are you waiting for? Get started today with SubtitleBee!
The bottom-line:
- A live caption is an excellent tool for anyone who needs help understanding what’s being said in a video. It also makes videos more accessible for people with hearing impairments, allowing them to enjoy the content they may have previously been unable to access.
- Additionally, Live captioning can be used in noisy environments where it would otherwise be difficult to hear what’s being said.
- A live caption is not only beneficial for people with hearing impairments; it can also be beneficial for those who are learning a new language. Having the audio transcribed into text can help them become more familiar with how words are pronounced and spelled in their target language.
- A live caption is a beneficial tool for anyone needing extra help understanding what’s being said in a video.
- Language learners can also use it to help them better understand how words are pronounced and spelled in their target language.
Add and translate your subtitles to more than 100 languages with high accuracy


