



video tutorials for social media
How to Add Subtitles in Premiere Pro: Auto and SRT Methods
Premiere Pro can transcribe your dialogue and turn it into a caption track in a few clicks, and it can also take a finished SRT file from another tool. Which route is faster depends on your video, your language and how much proofreading you want to do inside the editor. This guide shows how to add subtitles in Premiere Pro both ways, then covers translating, styling and exporting them without surprises.
Before You Start: Premiere Pro Is Now Called Adobe Premiere
In January 2026, with version 26.0, Adobe renamed Premiere Pro to Adobe Premiere. The captioning tools did not go anywhere. Adobe’s help pages now use the new name, so if you search the documentation you will see “Premiere” rather than “Premiere Pro.” Everything below applies to current versions, and most of it applies to recent Premiere Pro releases too, because the Speech to Text and captions workflow has been in the app for several years.
You will need three things:
- A sequence that is close to final. Adobe recommends adding captions when your edit is finished or nearly finished. If you cut a section after captioning, the caption segments for that section are gone, and you have to recreate them by hand if you restore the footage.
- Clean dialogue audio. Transcription accuracy depends on what the software can hear. Music under speech, crosstalk and room echo all cost you accuracy.
- The language pack for your video’s language. Premiere downloads it when you pick the language in the transcription settings.
Method 1: How to Add Subtitles in Premiere Pro With Auto Captions
Premiere Pro auto captions are a two-stage process. First Premiere transcribes the audio, then it converts that transcript into timed captions on a caption track. Here is the full sequence, using the menu names from Adobe’s current documentation.
Step 1: Switch to the Captions and Graphics Workspace
Select Window > Workspaces > Captions and Graphics. This layout puts the Text panel on the left, the Program Monitor in the middle, the Properties panel on the right and the Timeline along the bottom. You can caption in any workspace, but this one keeps every tool you need on screen.
Step 2: Transcribe the Sequence
If you ticked Automatic Transcription when you imported your media, Premiere has already created a transcript and you can skip to Step 3.
If not, open the Text panel (Window > Text) and go to the Transcript tab. Select the icon in that tab to open the transcription options, where Adobe’s help page describes a Generate static transcript option. Then set:
- Language: the language spoken in the video. Download the language pack if Premiere asks.
- Speaker labeling: whether to separate different speakers in the transcript.
- Audio analysis: transcribe clips tagged as Dialogue in the Properties panel, or transcribe a specific audio track. Pick the track with your voice if music and voice sit on separate tracks.
- Transcribe In point to Out point only: useful when you only need part of a long sequence.
- Merge output with existing transcription: adds the new section to a transcript you already have.
Select Transcribe. This is the Premiere Pro transcribe step. When it finishes, the transcript appears in the Transcript tab, where you can read it and correct words before any captions exist.
Step 3: Create Captions From the Transcript
Select Captions > Create captions from transcript, or select the Create captions icon in the header of the Transcript tab. The Create captions dialog gives you:
- Caption preset: Subtitle default suits most videos.
- Format: the caption format. Leave it on the subtitle format unless a broadcaster has asked for something specific.
- Style: any caption style you have saved.
- Length, duration and gap: the maximum characters per line, the minimum time each caption stays on screen, and the gap between captions.
- Lines: single or double.
For social video, shorter lines read better on a phone. Try a lower character limit and single lines, then check a few captions in the Program Monitor before committing.
Select Create captions. Premiere adds a caption track above your video and aligns each caption to the dialogue.
Step 4: Proofread in the Text Panel
This is the step people skip, and it is the one that matters most. Read every caption in the Captions tab of the Text panel while you play the sequence. Look for brand names, product terms, numbers and names of people, which are the words speech recognition gets wrong most often. Correct the text right in the Captions tab, and drag the edges of a caption segment on the timeline if it appears too early or hangs too long.
Method 2: Import an SRT File Into Premiere Pro
The second way to add captions in Premiere Pro is to bring in a subtitle file you made somewhere else. Adobe supports this directly: its help page on importing a caption file from a third-party service describes the same three steps shown below.
This route makes sense when:
- You want a proofread, translated subtitle file before you open Premiere at all.
- Several editors or platforms will reuse the same subtitles.
- Your video’s language is not covered by Premiere’s language packs, or the built-in transcript needs more cleanup than you have time for.
Create the SRT File in SubtitleBee
SubtitleBee generates subtitles with AI and lets you download them as a file for use in your video editor.
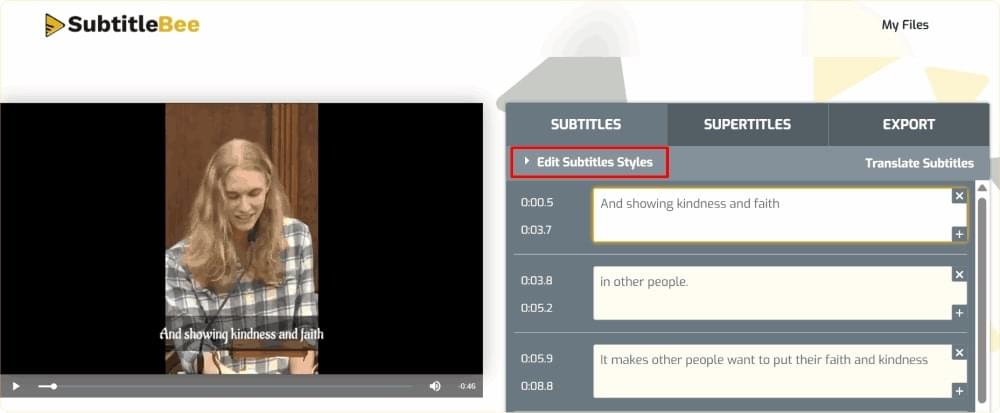
- Upload your video. Export a reference file from Premiere (a quick H.264 export is fine), then upload it or paste a link. SubtitleBee accepts MP4, MOV, WMV, AVI and WebM.
- Choose the spoken language and let SubtitleBee generate the subtitles.
- Proofread and adjust. Fix any wrong words in the editor, preview the video and make timing adjustments where a line lands early or late.
- Translate if you need other languages. Select Translate Subtitles to create a version in any of 100+ languages, then review it the same way.
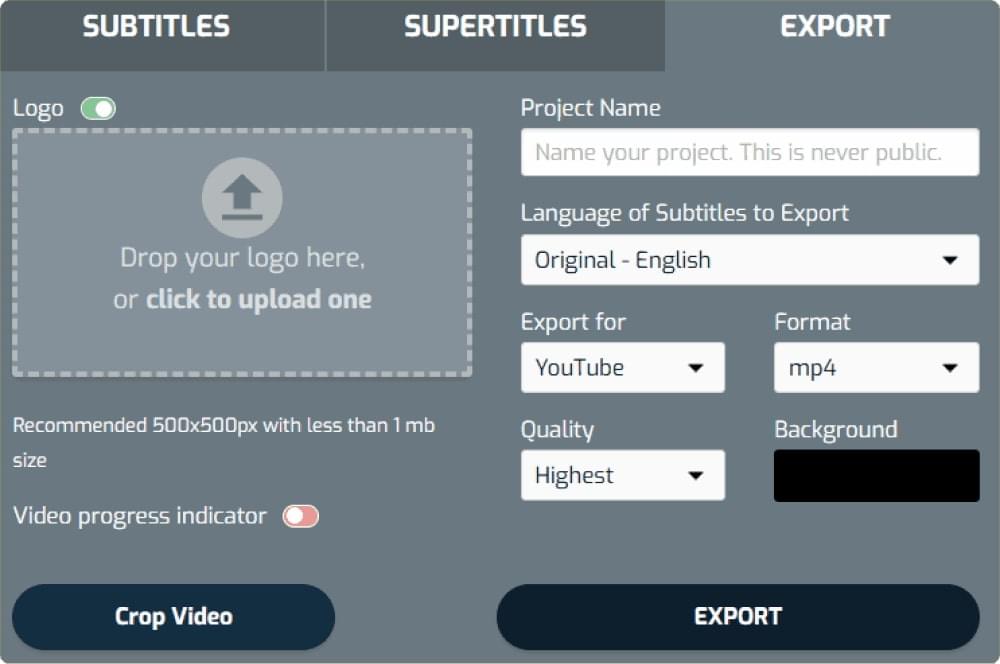
- Download the subtitle file as .srt. SubtitleBee also exports .vtt, .ass and .txt, but SRT is the format Adobe’s import instructions are written for. SRT and TXT downloads start on the Starter plan, VTT and ASS need Premium or Business, and the free plan lets you generate and review subtitles but not download them.
If you have never looked inside a subtitle file, our guide on how to create an SRT file explains the format line by line, which helps when you need to fix something by hand.
Import the SRT Into Your Sequence
- Import the SRT into your Premiere project the same way you import any media, with File > Import or by dragging it into the Project panel.
- Drag the SRT from the Project panel into your sequence and drop it anywhere.
- Premiere creates a new caption track and places the captions on it.
Because SubtitleBee timed the file against the same cut you exported, the captions should line up with your dialogue. If you trimmed the sequence after exporting the reference file, re-export and regenerate, or nudge the captions on the timeline. For bigger drift, see our guide to fixing out of sync subtitles.
How to Translate Captions in Premiere Pro
Premiere can also translate a caption track itself. Select the Translate captions icon in the Captions tab, choose the target language and select Translate. Adobe’s documentation says the translation runs through a cloud service using Google Translate and Microsoft Translator, so you need an internet connection. Premiere creates the translation as a new caption track, and you can show or hide each language with the eye icon on its track.
Machine translation is a first draft. Have a speaker of the target language review it, especially for idioms, jokes and anything legal or medical. If you already translated in SubtitleBee, import each language’s SRT as its own caption track instead.
How to Style Premiere Pro Captions
Select a caption on the timeline and use the Properties panel to change how it looks:
- Text: font, size and alignment.
- Appearance: Fill for text color, Stroke for an outline, Shadow for depth. A thin stroke or a soft shadow keeps white text readable over bright footage.
- Align and Transform: position the captions on screen. For vertical video, lift them above the area where platform buttons and descriptions sit.
To reuse a look, open the Track style menu, select the plus icon and choose Create style. You can save it to the project or to your local styles for future projects. After you change one caption, apply the change to the rest with the Redefine style icon and All captions on track.
How to Export Your Premiere Pro Captions
Select Export in the header bar at the top of Premiere to open the Export workspace. In the captions settings you have three choices:
- Burn in the captions. Premiere renders the caption text into the video frames. Viewers cannot turn them off, and they show up everywhere, which is what you want for Instagram, TikTok and other feeds that autoplay on mute. Our guide to hardcoding subtitles covers when burned-in text is the right choice.
- Create a sidecar file. Premiere writes a separate caption file next to the video. An .srt holds one caption stream per file, so export each language separately. Upload the SRT to YouTube or your video player so viewers can switch captions on and off.
- Embed the captions in the output file. This works for broadcast caption formats such as CEA-608 and CEA-708 in supported containers like QuickTime and MXF. Most web publishers will not need it.
Only enabled caption tracks are included, so check the eye icons on your caption tracks before you export.
Auto Captions or SRT Import: Which Should You Use?
| Premiere Pro auto captions | SubtitleBee SRT import | |
|---|---|---|
| Where you proofread | Inside Premiere, in the Text panel | In SubtitleBee, before you open the timeline |
| Translation | Built-in machine translation, new track per language | 100+ languages, one SRT per language, reviewed before import |
| Reuse outside Premiere | Export an SRT at the end | You already have the SRT |
| Best for | Single-language videos you are editing anyway | Multi-language projects, shared subtitle files, teams with several editors |
If you only ever caption one language and you are already in the timeline, Premiere’s built-in tools are hard to beat. If you publish the same video in several languages, or you want the subtitle file checked by someone who does not use Premiere, generating the SRT first saves you the back and forth. The same SRT also works in other editors; see our guide on how to add subtitles in DaVinci Resolve if part of your team edits there.
Common Problems and How to Fix Them
The transcript is full of errors. Check that you chose the right language and the right audio track under Audio analysis. If music and dialogue are mixed on one track, transcription accuracy drops.
Captions drift out of sync after an edit. Captions follow the timeline, so ripple edits made after captioning can leave segments behind. Caption last, or regenerate the section with Transcribe In point to Out point only and Merge output with existing transcription.
The SRT imports but shows nothing. Make sure the caption track is enabled with the eye icon, and that the SRT dropped onto the sequence rather than into a bin.
Captions appear in an export where you did not want them. Check that burn-in is off in the Export settings and that you exported a sidecar file only.
Frequently Asked Questions
Can Premiere Pro Generate Subtitles Automatically?
Yes. Premiere transcribes your dialogue with Speech to Text and then creates captions from the transcript through Captions > Create captions from transcript. You still need to proofread the result.
How Do I Import an SRT File Into Premiere Pro?
Import the SRT like any media file, drag it from the Project panel onto your sequence, and Premiere creates a caption track with the subtitles on it.
Can I Translate Captions in Premiere Pro?
Yes. Use the Translate captions icon in the Captions tab. Premiere sends the text to cloud translation services and creates a new track per language. You can also import an SRT for each language you translated elsewhere.
Should I Burn in Captions or Export an SRT?
Burn them in for social feeds where videos autoplay without sound. Export an SRT for YouTube, course platforms and your own player, where viewers can switch captions on or off and the text can be indexed.
Get Your SRT Ready Before You Open Premiere
Premiere’s caption tools are strong once your subtitles are right. Getting them right, and in more than one language, is the slow part. Try SubtitleBee to generate, proofread and translate your subtitles, then drop the SRT onto your timeline and move on to the edit.


Add and translate your subtitles to more than 100 languages with high accuracy
Our solution
SubtitleBee
Make your video understandable by using SubtitleBee for free
Start now for freeTop Articles

Getting Started with AI-Powered SubtitleBee

3 Effective Ways To Add Subtitles To Video Online Without Watermark

VEED vs. Kapwing: Which Subtitle Generator wins?

Kapwing vs. SubtitleBee: Which subtitling tool should you choose?

5 Top Verbit Alternatives for Transcription