



video tutorials for social media
How to Add Captions and Subtitles in iMovie (Mac & iPhone)
iMovie is Apple’s free video editor for Mac, iPhone and iPad, and a common first choice for anyone who wants simple video editing software. If you want captions or subtitles on your video, iMovie can do it, but only one way: you type each line yourself as a title and time it by hand.
This guide shows exactly how to do that on Mac and on iPhone or iPad, using the button and menu names from Apple’s current iMovie user guides. It also covers what iMovie can’t do with captions, a faster workflow that generates captions automatically, and when Final Cut Pro is the better tool.
Table of Contents
- Subtitles vs Captions: Which One to Add in iMovie?
- Why Add Subtitles to Your iMovie Videos?
- What iMovie Can and Can’t Do With Captions
- How to Add Captions in iMovie on Mac
- How to Add Captions in iMovie on iPhone and iPad
- Faster Workflow: Auto-Generate Captions With SubtitleBee
- Alternatives: Final Cut Pro and Apple Clips
- Tips to Add Accurate Subtitles
- Conclusion
- FAQs
Subtitles vs Captions: Which One to Add in iMovie?
People often use the two terms interchangeably. Both make a video more accessible, but they are not the same thing.
- Subtitles transcribe or translate the spoken dialogue in a visual content. They assume the viewer can hear the rest of the audio, such as music and sound effects.
- Captions represent all the important audio: the dialogue plus non-speech sounds like (applause), (phone ringing) or [upbeat music], and sometimes tone of voice.
In iMovie, both are made the same way: as on-screen titles you type yourself. So the choice is about what you write, not which feature you use. If your audience includes deaf or hard-of-hearing viewers, write captions. If you are translating, write subtitles. If you want the text generated for you, use a video caption generator and skip the typing.
Related: Closed Captioning vs Subtitles: What is the Difference?
Why Add Subtitles to Your iMovie Videos?
- Reach more people: Subtitles make your videos more accessible to a larger audience, including non-native speakers.
- Include viewers with hearing loss: Captions let deaf and hard-of-hearing viewers follow the video.
- Hold attention on mute: Many people scroll social feeds with the sound off. Text on screen keeps them watching, which helps audience engagement.
- Give platforms more context: A caption file uploaded to YouTube gives the platform a text version of everything you say, not just your title and description.
Also Read: The Impact of Subtitles on Video Marketing Success
What iMovie Can and Can’t Do With Captions
We checked Apple’s current iMovie User Guides for Mac and iPhone (iMovie 10.4 for Mac and iMovie 3.0 for iPhone and iPad). Neither guide has a captions or subtitles section. Captions in iMovie are simply titles.
What iMovie can do:
- Add a title over any video clip, photo or background and type your own text.
- Change the font, size, color and style of that text.
- Set how long each title stays on screen.
- Export the finished video with the text visible.
What iMovie can’t do:
- No automatic captions. iMovie has no speech-to-text, transcription or auto-caption feature on any platform. Every line is typed by hand.
- No SRT or VTT import. You can’t load a subtitle file into iMovie.
- No SRT or VTT export. iMovie can’t produce a caption file for YouTube or other platforms. The export options cover video and audio formats, resolution and quality only.
- No closed captions. Titles are burned into the picture. Viewers can’t turn them off, and you can’t switch languages.
- Titles are tied to clips on iPhone and iPad. Each title belongs to one clip, so for a new caption line you split the clip first. Apple notes that splitting lets you “add different titles to each section.”
- Some titles are locked. Apple says you can’t change the font in certain theme titles and some animated titles.
If you need auto captions, a caption file or multiple languages, skip to the SubtitleBee workflow or the Final Cut Pro section.
How to Add Captions in iMovie on Mac
These steps follow Apple’s guides to adding titles and modifying titles in iMovie on Mac.
1. Create a movie project. Open iMovie, go to Projects view, click Create New, then click Movie (Apple guide).
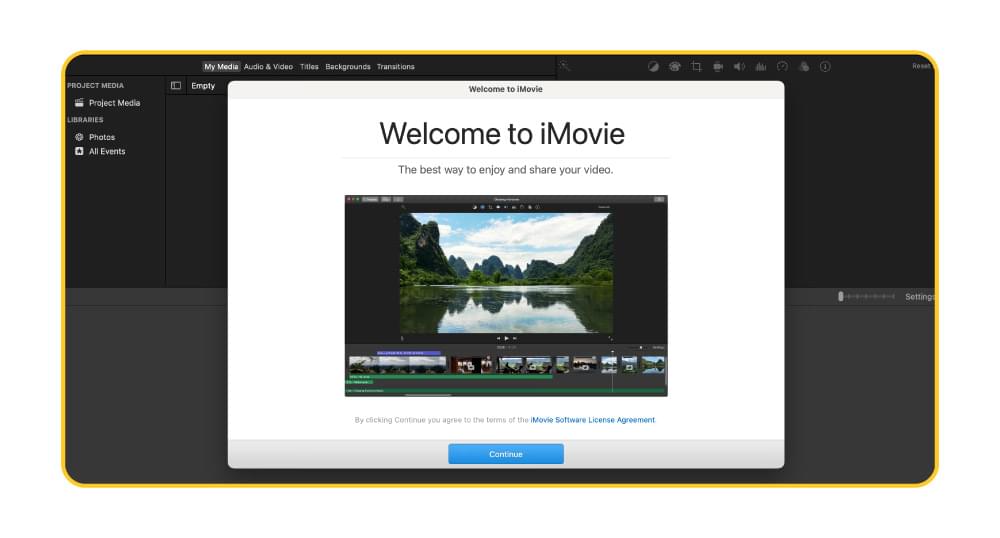
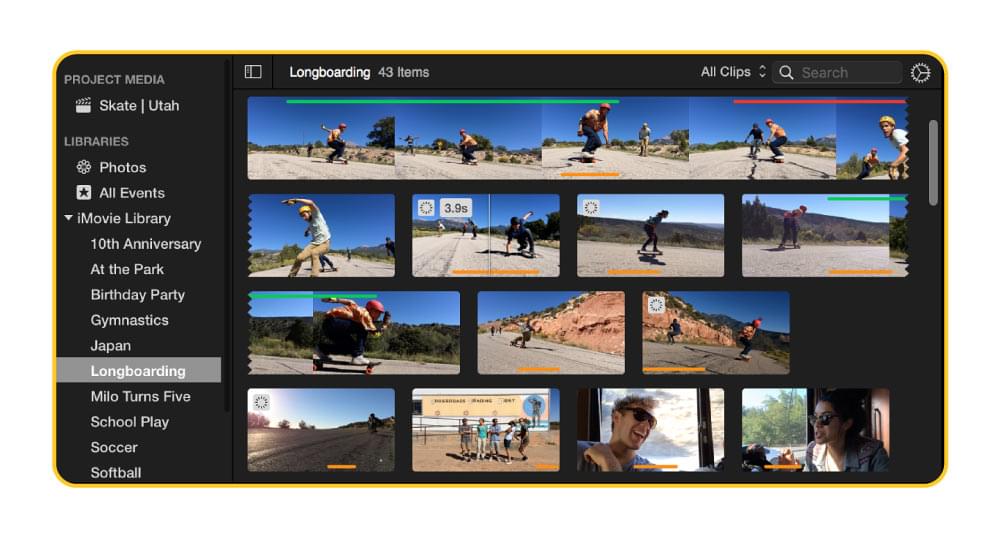
2. Add your video. Click the Import button in the toolbar, or drag the file from the Finder into an event in the Libraries list. Then drag the clip into the timeline.
3. Open Titles. Click Titles above the browser. Use the search field to find a simple, static style, such as a lower-third title. Skim the thumbnails to see if a style animates. Animated styles are distracting for captions. iMovie titles work as an overlaying text option, so the same steps work for captions and subtitles.
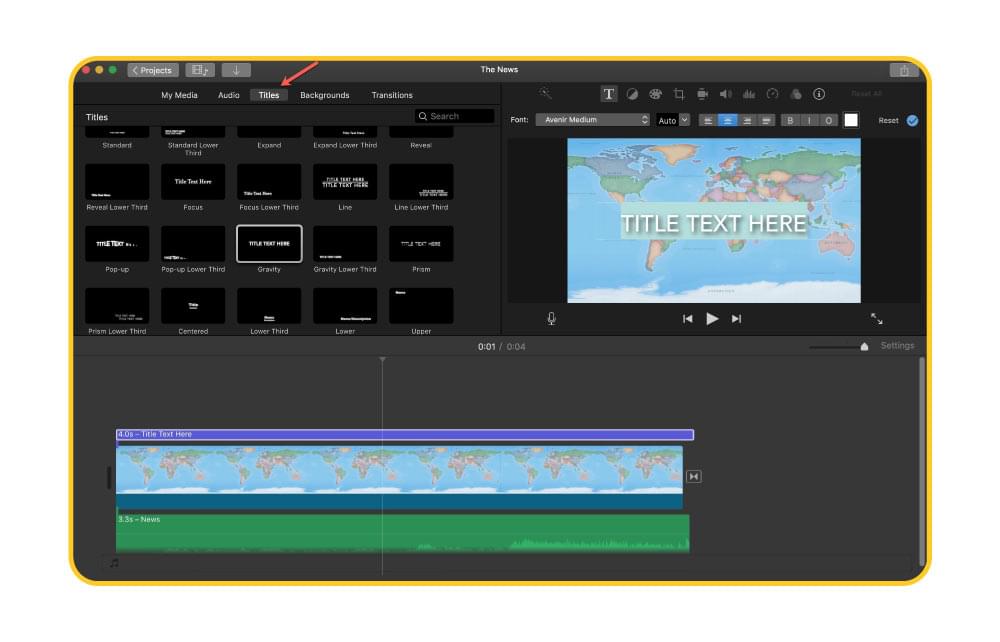
4. Place the first caption. Move the playhead to where the first line is spoken and double-click the title style. It’s added at the playhead. You can also drag the style onto the timeline, above the clip.
5. Type the text. In the viewer, double-click the placeholder text and type your caption. If the style has a second text field, press Tab to move to it, or clear its placeholder text.
6. Format it. Use the font controls above the viewer: the Font pop-up menu, the Size pop-up menu, the alignment buttons, the B, I and O (bold, italic, outline) buttons and the color well. For more fonts, choose Show Fonts at the bottom of the Font pop-up menu. White text with the outline turned on stays readable over most footage. Click the Apply button when you’re done.
7. Set the duration. Drag either edge of the title bar in the timeline to lengthen or shorten it. For exact timing, select the title, click the Clip Information button in the adjustments bar and type a value in the Duration field.
8. Adjust position. Position on Mac comes from the title style. To move a caption, pick another style: double-click the title, click Titles and double-click the new style. Apple says the new style keeps the duration and text edits.
9. Repeat for every line. Add the next title where the next line starts. To keep a consistent look, reuse the same style each time. With snapping on (View > Snapping), title edges line up with clip edges. Play the video back a few times to check the sync.
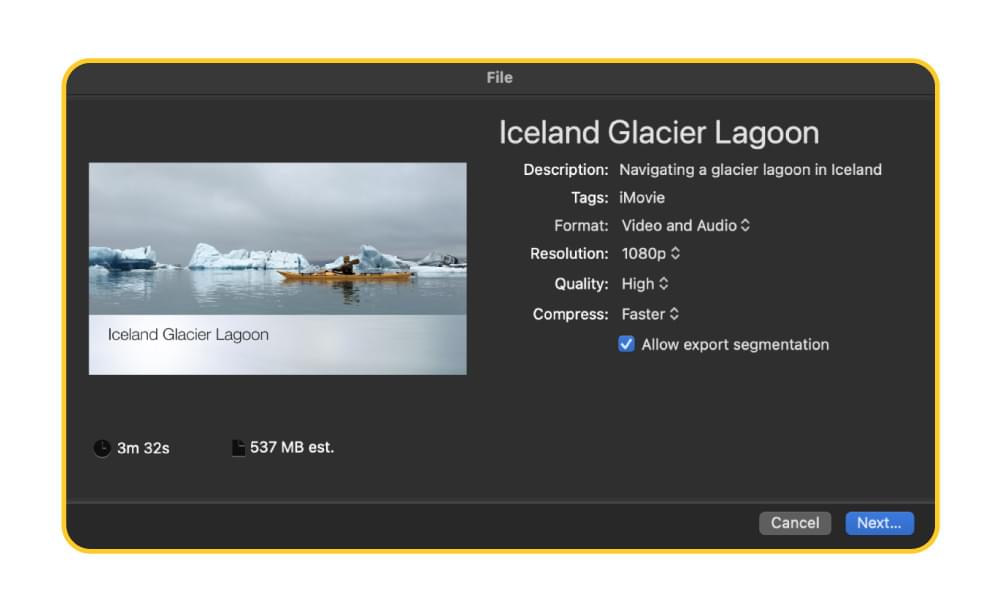
10. Export. Select the project and choose File > Share > File. Pick the format, resolution and quality, click Next, then Save (Apple guide). The captions are burned into the exported video.
To delete a caption, select its title bar in the timeline and press Delete.
How to Add Captions in iMovie on iPhone and iPad
On iPhone and iPad, titles belong to clips. The steps are the same on both devices and follow Apple’s guides for iPhone and iPad.
- Create a movie project. Tap Start New Project, then Movie. Select your video and tap Create Movie (Apple guide). Use a movie project, not Magic Movie or Storyboard, because movie projects have the full timeline tools.
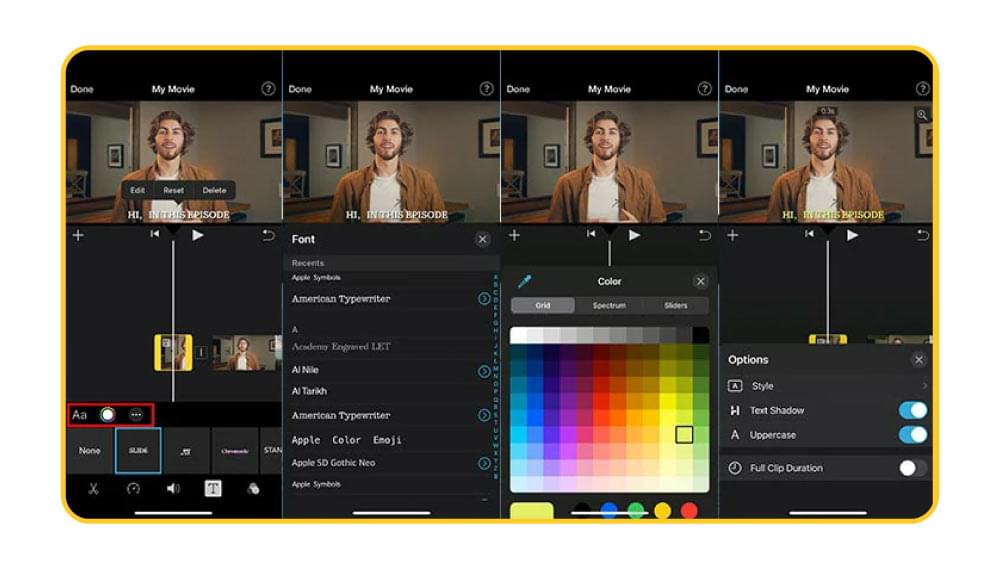
- Split the clip at each new line. Scroll the timeline so the playhead sits where a caption line starts. Tap the clip, tap the Actions button, then tap Split. You can also swipe down over the playhead. Repeat for every line.
- Add a title. Tap the first section, tap the Titles button in the inspector at the bottom, and choose a style.
- Type the caption. Tap the sample title in the viewer, tap Edit, type your text, then tap Done on the keyboard.
- Position it. Drag the title where you want it, or pinch to resize it. You can also tap Style, then Lower Third, to place it near the bottom.
- Format it. Use the Font and Color buttons. Tap the More button for options like Text Shadow, which improves readability, and Full Clip Duration, which keeps the title up for the whole section.
- Repeat for each section. Tap the next section and add its title. A T icon marks clips with a title.
- Export. In the Projects browser, tap the project, tap the Share button, then Share Video. Tap Options to pick a resolution, then Save Video or Save to Files (Apple guide).
To remove a title, tap the clip, tap the Titles button, then tap None. Because every caption needs its own split, a talking-head video of a few minutes can need dozens of splits, so this method works best for short clips.
It is evident that adding subtitles in iMovie takes time and invites errors. A faster route is to automatically transcribe the video and generate the subtitles.
Related: How to Add Subtitles in DaVinci Resolve 2025
Faster Workflow: Auto-Generate Captions With SubtitleBee
SubtitleBee does the part iMovie can’t: it listens to your video and writes the captions for you. Here is a workflow that pairs it with iMovie.
- Finish your edit in iMovie first. Cut, trim and add music, but don’t add captions yet. Export with File > Share > File on Mac, or Share Video on iPhone and iPad. Captioning the final cut keeps the timing right.
- Upload to SubtitleBee. Sign in and upload the exported video. SubtitleBee generates AI subtitles automatically, with accuracy of up to 95%.
- Review and fix. Read through the text, fix names and technical terms, and adjust timing where needed. Always proofread, because no AI caption tool is perfect.
- Style the captions. Change the font, color, size and opacity to match your brand.
- Choose your output:
- Burned-in video for Instagram, TikTok, LinkedIn or anywhere viewers watch on mute. Download the video with the subtitles embedded.
- Subtitle file for YouTube and other platforms that accept caption files. Download an SRT, VTT, TXT or ASS file and upload it next to your video. SRT works with YouTube, Facebook and Vimeo, as Apple’s Final Cut Pro guide notes. Viewers can turn these captions on or off. See our guide on adding subtitles to YouTube videos.
- Translate if needed. SubtitleBee can translate captions into 100+ languages, which you can’t do in iMovie without retyping every line.
If you prefer to keep the captions as iMovie titles, download the TXT transcript and paste each line into your titles. You still time them by hand, but you skip the typing.
SubtitleBee has a free plan that includes 10 minutes of auto subtitles, so you can test it on a short video. Here’s how it works:
Alternatives: Final Cut Pro and Apple Clips
Final Cut Pro. Apple’s pro editor has real caption tools. Generate Captions (Edit > Generate Captions) transcribes speech into closed captions or subtitle titles, but it requires a Mac with Apple silicon and works in U.S. English only. Final Cut Pro can import CEA-608, iTT and SRT files and export them as separate files, or burn them in. You can move an iMovie project over with File > Send Movie To Final Cut Pro. It’s a paid app, so it makes sense if you edit often.
Apple Clips. Clips had Live Titles, which turned your speech into animated on-screen captions. Apple has discontinued Clips: it is no longer updated and has not been available to new users since October 10, 2025. If you already have it, you can redownload it, but don’t build a new workflow around it.
Tips to Add Accurate Subtitles
- Keep lines short. Aim for one or two short lines per caption so viewers can read them without pausing.
- Match speech timing. Start each caption when the line starts and end it before the next speaker. Check sync on a full playback.
- Prioritize readability. Use a plain font, a large enough size and high contrast. In iMovie, the outline (Mac) or Text Shadow (iPhone and iPad) option helps on bright footage.
- Keep the bottom clear. Lower-third placement is standard, but on vertical videos, platform buttons can cover the bottom and sides. Preview on a phone.
- Stay consistent. Use the same style, size and position for every caption.
- Check on different screens. Make sure captions are readable on phones and desktops.
- Use modern tools: Instead of typing and timing every line by hand, use an AI-powered subtitle generator and spend your time on proofreading.
Conclusion
You can add captions in iMovie on Mac, iPhone and iPad, but only as titles you type and time yourself. They are burned into the video, and iMovie can’t generate captions, import a subtitle file or export one. For a short clip with a few lines, the manual method works fine.
For anything longer, use a platform like SubtitleBee to generate the captions, then export a burned-in video or an SRT file. Keep iMovie for what it does well: cutting and polishing your video.
Related: The Best Guide To Add Subtitles To Your Video In 5 Minutes
FAQs
Can iMovie generate captions automatically?
No. iMovie has no automatic captions, speech-to-text or transcription on Mac, iPhone or iPad. You type every caption as a title. To generate captions automatically, use a tool like SubtitleBee or Final Cut Pro’s Generate Captions feature.
Can I import an SRT file into iMovie?
No. iMovie can’t import SRT, VTT or other subtitle files, and it can’t export them either. To use an SRT file, upload it to the platform with your video (for example, YouTube), burn it in with a subtitle tool, or use Final Cut Pro, which imports SRT.
Are iMovie captions closed captions?
No. iMovie titles are burned into the picture, so viewers can’t turn them off. For toggleable closed captions, upload a separate caption file, like an SRT, to platforms that support it.
How do I make a caption stay on screen longer in iMovie?
On Mac, drag the edge of the title bar in the timeline, or use the Clip Information button and type a Duration. On iPhone and iPad, a title follows its clip, so trim or split the clip, and turn on Full Clip Duration under the More button.
Can I add multilingual captions in iMovie?
Only by typing each language by hand, and you can’t switch languages because captions are burned in. To add multilingual captions, generate them with SubtitleBee, translate them into any of 100+ languages and export a separate SRT file for each one.
Is there a free way to auto-generate captions for an iMovie video?
Yes. Export your video from iMovie and upload it to SubtitleBee. The free plan includes 10 minutes of auto subtitles, which is enough to test it on a short video before you decide on a paid plan.



Add and translate your subtitles to more than 100 languages with high accuracy
Our solution
SubtitleBee
Make your video understandable by using SubtitleBee for free
Start now for freeTop Articles

Getting Started with AI-Powered SubtitleBee

3 Effective Ways To Add Subtitles To Video Online Without Watermark

VEED vs. Kapwing: Which Subtitle Generator wins?

Kapwing vs. SubtitleBee: Which subtitling tool should you choose?

5 Top Verbit Alternatives for Transcription